 Loading ...
How Does Resin Polymerization Work

What you’ll learn:
1. What is 3D Printing Resin?
2. What is Polymerization in 3D Printing?
3. The Ins and Outs of Post-Processing in Digital Dentistry
4. Key Takeaways
In today’s world of dentistry, it is almost impossible to remove the terms ‘3D printing’ and ‘digital’ from the picture. Additive manufacturing – otherwise known as 3D printing – is revolutionizing the industry. Its speed, accuracy, and affordability make it an increasingly popular choice among dentists and lab technicians who want to prioritize these in their practice or laboratory. The Ackuretta SOL Plus and the Ackuretta SOL are just some examples of printers making printing easier, faster, and more accessible to everyone – whether it’s splints, surgical guides, dentures, or anything in between.
3D printing has been around for more than 40 years, but has grown exponentially in the past 10 years, and is projected to keep growing – today, there are roughly 230 dental 3D printers manufactured by more than 75 players worldwide1; the global dental 3D printing market is estimated at roughly $3.2 billion in revenue2, and is predicted to grow to $9.5 billion by 20273. It has revolutionized production that spans from the medical, dental and aerospace industries to culinary and automotive fields.
While there are many different printing technologies on the market, those used in the digital dental field include Stereolithography (SLA), Digital Light Processing (DLP), and Liquid Crystal Display (LCD) (RGB and Monochrome). All of these methods use liquid resin as the material from which the prints are made. Through a process of polymerization, this resin is transformed from a liquid into a solid, and after post-processing results in a print that is both durable and biocompatible.
While you may be familiar with the different steps in a digital workflow (to learn more, you can take a look at the Step-by-Step process here), the technology that turns liquid resin into a solid print is less well-known. But this innovation behind it is truly fascinating, and worth taking a closer look at.
To understand this process of polymerization, let’s first understand the material that goes through this process – resin.
What is 3D Printing Resin?
Resin is a substance that can be produced either naturally or synthetically, and is made up of different components depending on its use and function. It is the material used in 3D dental printing – for everything from models to dentures and surgical guides. While simply known as ‘resin’ or ‘material’ in the 3D printing world, it can also be called polymer resin, resin-based composite (RBC), or photo-sensitive resin.

The resins on the market are differentiated based on their composition – a combination of monomers, crosslinkers, fillers (for example, ceramics in the case of permanent resin), pigments, and other chemical components. These components and their proportional quantities determine the accuracy, printing performance, biocompatibility, mechanical properties, and more elements of the final print you are trying to achieve. All dental 3D printing resins – and photopolymer resins in general – should have at the minimum a monomer4 (the main component), a crosslinker and a photoinitiator (which will react when it comes into contact with UV light).
Prior to composite resins, other materials were used in dental applications, especially as they pertained to fillings – gold, then concrete, and dental amalgam5. The 1950s and 60s saw the formulation of the first composite resins, and appearance of the term ‘composite’ in dentistry (previously ‘reinforced’).
The range of resins available on the market is growing all the time, and this is where the potential and progress in the future of 3D printing lies. The number of applications that can be printed is expanding accordingly – companies are currently working on creating a resin to print reliable aligners in-house, which would be a game-changer for the industry. And the speed at which it can be done is also increasing – it is possible to print a crown and have it in your patient’s mouth within an hour with resins such as the new Ackuretta FLOW C&B, ideally for provisional restorations.
Ackuretta's new dental 3D printing resins, FLOW, bring high precision and biocompatibility to dental 3D printing. Certified by FDA, MDR, and Health Canada, these resins are ideal for creating crowns, bridges, splints, dentures, and more. The FLOW C&B resin provides long-term restorations with excellent mechanical strength, aesthetics, radiopacity, high impact resistance, and high temperature resistance, while requiring minimal polishing. FLOW Hard Splint offers durable and comfortable bite splints, and FLOW Denture ensures a precise fit with its anti-shrinkage formulation, also featuring high impact and temperature resistance. These resins integrate seamlessly into Ackuretta's validated 3D printing workflow, ensuring faster printing, easy post-IPA cleaning stability, and reliable patient outcomes. Incorporating these advanced materials enhances the reliability and safety of dental 3D printed products.
Now that we understand the material that we’re handling, let’s explore what happens to this resin – polymerization. Time to see what’s under the hood.
What is Polymerization in 3D Printing?
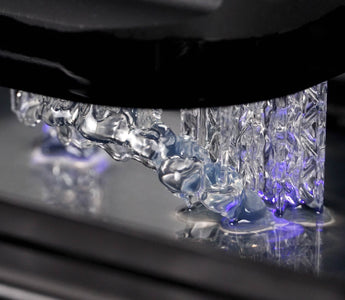
Polymerization is the chemical process of turning resin from a liquid into a solid, through the formation of chemical bonds between the molecules of the resin. During printing, a vat of photopolymer resin is placed in front of a UV light source – that is, for example, the LCD screen on your Ackuretta SOL Plus / SOL, for example. The monochrome (or in some cases RGB) LCD screen allows the UV light to be emitted in a specific pattern – the resin only cures in those specific areas which come into contact with the light. Each layer is printed in the specific pattern in which the light is emitted.
The process of polymerization happens in three phases: initiation, propagation, and termination.


In the initiation phase, a catalyst (in this case, UV light) starts a reaction with the photoinitiator which releases a free radical. Photoinitiators release these free radicals upon specific wavelengths of that light source. This is what starts the process of polymerization.
This free radical bonds with a monomer and opens up the double bond, which starts a chain reaction. One monomer’s double bond opens, which then bonds with another monomer opening up its double bond, which bonds with another monomer, and so on. This process is known as the propagation phase. More monomers become bonded together, creating long chains of molecules called polymers.
The termination phase occurs when two long chains – each with an open monomer on one end – bond together, forming one long chain. In other words, when the last free radical on one chain meets the last free radical on another chain. They combine, and the process is finished. This long polymer chain is one of many which make up the solid print.
Note: In 3D printing with an LCD screen, like the Ackuretta SOL Plus, SOL and DENTIQ, the resolution of the print is determined by the size of a single pixel. In SLA (with a laser), the laser size determines that definition. DLP resolution is based on the definition of the projected image. Additionally, higher resolution does not equal longer printing time.
The polymerization process works as follows:
1. Liquid resin is poured into the vat or tank.
2. A 3D model is created using CAD software, and then sliced into multiple layers using software such as ALPHA AI.
3. The 3D printer uses UV light – via LCD screen or laser – to selectively cure the resin in the pattern corresponding to each layer of the 3D design.
4. The build platform is lowered and then raised as each layer is cured, allowing the next layer of liquid resin to be exposed and cured on top of the previous one.

5. This process is repeated for each layer of the 3D print until the entire product is complete.
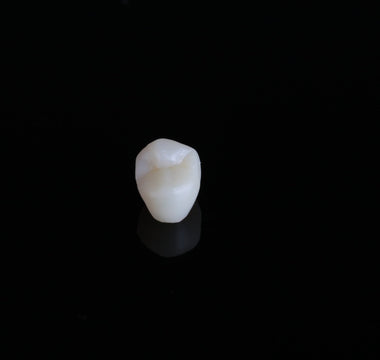
The result of this photopolymerization process is a solid object made of cured resin, which must then go through post-processing, to ensure that it is fully cured and biocompatible. This is especially important for applications that will be in the patient’s mouth for an extended period of time – splints, crowns, and dentures.
The Ins and Outs of Post-Processing in Digital Dentistry
Once your print is finished printing, the post-processing steps ensure that your print is fully cured, and safe for your patient.
Cleaning
The cleaning step – which is done with either ethyl alcohol or isopropyl alcohol (IPA) – removes any uncured resin from the print, and any polymers that are cured but not fixed to the print. While cleaning is not part of the polymerization process, it is a necessary step in delivering a safe, high-quality final result to the patient or clinician. A dual-tank cleaning unit, such as the CLEANI with Dual Tanks, is an ideal tool for this step.
Post-Curing
Post-curing is the final step in the process, and is performed with the help of a UV curing oven like the CURIE or CURIE Plus. It ensures that all the expected polymerizations are complete6. Once your print has been cleaned of all uncured resin, placing it into a curing oven with UVs of different wavelengths is needed to penetrate the print and complete the polymerization process, ensuring safety and full mechanical properties.
Once this final curing step is completed, your print is all finished, and ready for your patient!
Key Takeaways
- Resin is made up of photoinitiators, monomers, crosslinkers, fillers, pigments, and other chemical components.
- There are three phases in polymerization: initiation, propagation and termination.
- Post-processing is essential to ensure that you have a print that is durable and biocompatible.
______________________________________________
1 According to Sky Research Forecast’s Global Dental 3D Printing Market.
2 According to MarketsandMarkets’ Dental 3D Printing Market.
3 According to Burkhart Dental Supply’s 3D Printing: The Future of Dentistry.
4 The monomers used for Ackuretta’s resins have a methacrylate organic compound. We say our resin is a methacrylate-based resin.
5 Dental composite resin: A review by Yori Rachmia Riva and Siti Fauziyah Rahman.
6 An overcuring would be if an excessive amount of reacting, which may cause more polymerization reactions, cross-linking reactions or adverse side reactions than wanted.
______________________________________________
Definitions
Monomers: small organic molecules that can form a repeating pattern when covalently bonded to one another.
Polymers: big molecules that are made up of smaller monomer units which are covalently bonded in a repeating pattern.
Polymerization: a process through which a large number of monomer molecules react together to form a polymer.