Why Do You Need to UV Cure Your 3D Printed Dental Application?

As the dental industry continues moving in the direction of more advanced technologies, 3D printing is being adopted by an increasing number of practices and laboratories around the world. By 2028, the global dental 3D printing market is predicted to be worth approximately USD 8.29 billion. Chairside same-day dentistry is becoming the norm, and one of the most important elements of a successful chairside solution is UV curing, which ensures a print is safe to use. Experts like Dr. Russell Schafer use Ackuretta’s complete dental 3D printing solution to deliver the best possible results to their patients – and are changing their lives in the process.
The 3D printed applications that many patients now receive are made of resin. There are different types of resin, with distinctive compositions and mechanical properties, depending on the desired application. Some resins are manufactured to print models (dental and other), others may be used to create surgical guides or temporary crowns and dentures, and others still will be used for more permanent restorations. For applications that do not need to be biocompatible, post curing is an important step. In the dental realm, however, ensuring high-quality biocompatible applications is crucial. Having a fully validated and biocompatible post curing workflow is therefore indispensable to any practice or lab.
To understand the role that post curing plays in post processing, we must first understand how it works.
1. How Does UV Curing Work?
Post curing is an extension of what happens during the printing process – polymerization. Simply put, polymerization is the process of putting light to photosensitive resin, which initiates a reaction that causes different molecules to bond together, creating polymer chains, and resulting in a solid print.
Curing resin post printing with light at various specific wavelengths ensures that the entire print is fully cured, and certifiably biocompatible. This curing process is essential for any printed application dentists are placing in a patient’s mouth – anything other than models, casts, and gingiva.
As Dr. Luis de Bellis explains, “many people dedicated to 3D printing do not give enough importance to the impact that the post-processing of the manufactured part will have. It is critical to highlight that post-processing helps us obtain more resistant pieces and contributes to applications that will not be cytotoxic. In other words, we will be able to guarantee to comply with international standards.”
Post curing strengthens your print and makes it more stable. In order to ensure the highest possible quality, you must take into consideration the light that is being used to cure your print.
2. UV Light Wavelength Spectrum
Ultraviolet (UV) radiation can be emitted naturally by the sun, or artificially through different artificial light sources. It can be divided into three bands, with different values measured in nanometers (nm) – UV-A (315-400 nm), UV-B (280-315 nm), and UV-C (100-280 nm). Different wavelengths have different effects – UVC is used to help in sterilization and disinfection, but is not typically used for direct human exposure, as it can be highly harmful to the skin and eyes; UVB can be used therapeutically for certain skin treatments, and can promote the production of vitamin D in the skin, but is also what causes sunburns; UVA is commonly referred to as “black light”, and can lead to the production of melanin, and wrinkles – it is also the wavelength used in polymerization (and counterfeit detection).

Photo Source: Electromagnetic Spectrum by National Eye Institute
In dental 3D printing, having a wide spectrum of wavelengths within the UVA range allows the UV light to penetrate prints at their deepest, giving a result that is stronger, more stable, and more durable. The higher conversion rate leads to better mechanical properties, such as hardness, flexural strength, flexural modulus, etc.
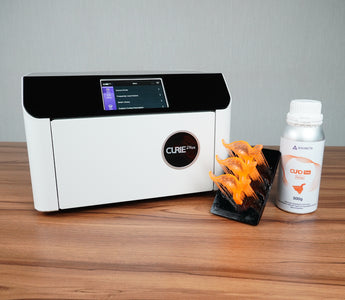
Ackuretta’s newly released CURIE Plus UV curing oven has a mix matrix LED spectrum of 365, 385, and 405nm which gives a thorough cure by penetrating deeper into the material and reacting with the photo initiators more thoroughly.
How long it takes to post cure depends on the resin and the print, as well as the power and intensity of your UV curing unit. While this means there is a wide range of possible curing times, most last 3 to 20 minutes.
3. What Makes a UV Curing Unit Biocompatible?
When it comes to biocompatibility, it is not the UV curing unit itself that is biocompatible, but the final results it is capable of delivering. As such, it is not simply the curing unit, but the resin and workflow as a whole which should be validated, to ensure the final results are in fact safe for patients. Ackuretta’s CURIE Plus, for example, has CE and FCC certifications, which are valid in the EU, USA, and most regions around the world.
Since classification as “biocompatible” refers to suitability, and the type of resin a curing unit can cure1, these units are identified as Class I or Class II curing units – or not classified at all. A UV curing unit that is designed for making action figures, for example, is one where biocompatibility is not a factor that matters – you are not placing Spider-Man in your mouth. But if you are a dentist or lab, and the results you produce are being placed in a patient’s mouth, biocompatibility becomes a key factor in your selection. How long an application will remain in a patient’s mouth determines its biocompatibility class, of which there are two – Class I and Class II2. You can take a look at this article to learn more about Class I and Class II curing ovens.
Non-mixed matrix, single-wavelength LED curing units are the most inexpensive ones available on the market, and use a single wavelength LED, which is usually 405nm. It is suitable for basic curing, but not a complete and reliable cure. Biocompatible units, on the other hand, will have light-emitting diodes (LEDs) working within specific and varied wavelengths, to ensure the results are valid and reliable.
With these specifically classified medical-grade devices, the curing parameters included are outlined to ensure that an application meets stringent requirements that allow it to achieve uniform post-polymerization and remain in a patient’s mouth for a specific amount of time. The International Organization of Standardization (ISO) develops international standards for a wide variety of products – including medical materials and devices. The ISO 10993 regulation is a biological evaluation of medical devices3.
A Note on ‘360° Lighting’
Some UV curing units require that the application be turned or flipped. When this becomes necessary, it can lead to inner shrinkage, or uneven curing, and leave you with an uneven final result. It also doubles the curing time required. High-quality, medical-grade UV curing ovens, on the other hand, are designed with ‘360° lighting’, meaning that the print will absorb light on all sides and surfaces, ensuring a complete and total cure, without a risk of shrinkage or uneven results. The print simply needs to be placed in the oven once, rather than being removed or rotated. These high-quality UV curing units will also have preset curing settings, to ensure a fully validated workflow.
4. Making the Chamber Inert
What?
With dental 3D printing, ensuring biocompatibility and high quality with every print is indispensable. Post curing is the final step which ensures this. During post curing, certain additional measures can help increase the quality of your output. One such measure is making the chamber inert.
Oxygen is in the environment all around us – including in your curing chamber. That oxygen creates a barrier between your print and the LED light, which is post curing that print. The layer of oxygen creates a barrier and can prevent the light from evenly and consistently curing your print correctly. This is known as oxygen inhibition. By removing the oxygen from the chamber, you are preventing this from occurring, resulting in a better, and more reliable, curing experience.
How?
There are several different ways to make a curing chamber inert, including glycerin immersion, vacuum sealing, inert gas glove boxes, chemical scavengers, carbon dioxide inerting, and nitrogen, each with its own benefits and drawbacks.
In the dental realm, nitrogen is the most commonly used method, primarily because of its price point, and the flexibility to use either a tank or a generator.
By substituting air with pure nitrogen (at least 95%), you are removing the oxygen that creates light distortions, thereby removing its adverse effects from the curing process. Once oxygen is removed, the application can absorb the UV light correctly.
Why?
Post curing in an inert chamber provides a variety of benefits. First, it increases the speed at which you are able to cure your prints. With more efficient light distribution, your applications are cured faster.
Second, it enhances the mechanical properties of your print, by increasing the amount of cross-linking that happens, resulting in a stronger and more durable result. Using nitrogen to make the chamber inert ensures you have more consistent results that are better quality – it also means no sticky areas or parts left uncured, whether on the inside or the outside. With a better output, it also reduces material waste, which in turn leads to cost-saving.
5. What is the future of curing?
As the technology of dental 3D printing improves and becomes more widely adopted, and as users pay more attention to the products they use and the benefits they offer, post curing will become more and more important – not only knowledge of its direct impact on the workflow, but also how its use can drastically improve patient outcomes.
Today, we have seen a massive change in the way dental professionals seek out and implement a 3D printing solution in their practice or lab. A fully validated workflow like Ackuretta provides has become the industry standard.
This is a change that we are seeing not only in the devices, but also in the materials. Resin manufacturers are becoming increasingly selective during the validation process – looking at how their resins fit into an entire workflow rather than just a single step – and the mechanical properties and performance requirements of those resins.
Looking to the future of dental 3D printing, users will be expecting each element of the workflow to have a very high level of performance – biocompatible, strong mechanical properties, and highly accurate and reliable results. Clinicians and lab owners and technicians will look for safety and accessibility in any product they purchase, as well as additions to make their entire 3D printing solution optimized – with post curing, this can be done through careful attention to the power of the unit, the use of nitrogen, heat, wavelengths of LEDs, and the integration of all other devices in the printing process.
6. CURIE Plus Benefits
The latest Ackuretta UV curing oven – CURIE Plus – takes your post curing to the next level, by offering a workflow with industry-leading validated resins, a more efficient printing timeline, and a larger chamber size and capacity, allowing users to post cure more prints at once. Its range of LED wavelengths of 365, 385, and 405nm ensures suitability for Class II bio-materials, meaning it will suit any of your biocompatible application needs.
The new CURIE Plus offers an improved UI/UX design, and increases ease of use by offering automatic resin parameter and firmware updates, and an automatic open/close door function. Furthermore, a native integration with SOL allowing your latest print parameters to be transferred directly to your curing unit reduces user error, and improves productivity.
In addition to those features, it is fully compatible with the use of nitrogen, which removes the effects of oxygen inhibition.
For more information on how CURIE Plus can elevate your curing game, click here.
_________________________________________________
1 The printing material itself – the resin – must also be validated by the manufacturer.
2 Class II can be further broken down into Class IIa, Class IIb, and Class IIc.
3 It is important to note that certifications and regulations for biocompatibility vary by location. Therefore what may apply in the EU may be different from the US, Australia, Japan, etc.







 Loading ...
