 Loading ...
Dental 3D Printing
The Tech Details behind 3D Printing - Part 2
Accuracy

The Tech Details behind 3D Printing - Part 2
Accuracy
What determines the accuracy of a 3D print? And what's the most accurate 3D printer?
While manufacturers boast about “super” and “ultra” accurate 3D printers, the accuracy of a print doesn’t just come down to the quality of the 3D printer and its components, but most importantly, to post-processing procedure, resins and ultimately, how you place the print on the build platform.
What does Accuracy in 3D Printing mean?
Here’s a little working definition of accuracy.
It is the ability to reproduce certain measurements over repeated tests. This means, if I print a 5cm x 5cm x 5cm cube then I want the result to be exactly that size and not off by a few millimeters.

How do you measure accuracy?
If you want to conduct your own tests in your clinic or lab, then follow this methodology to get comparable results.
- Set up your printer - be aware of the resin parameters and the printing parameters (curing time, layer thickness and xy resolution).
- Post-processing is essential for an accurate print. Make sure your curing time and UV light wavelength is adjusted to the dental application you are trying to produce. Ideally, you follow manufacturer guidelines.
- After post-processing, use your impression scanner to scan your finished product and compare it to your designed file. Repeat this process after 24h and again after 48h, to track potential resin shrinkage.
(In)Accurate Results
If your results look like this is, you are most likely using a quality resin and a reliable printer. The green area indicates that the print is within a ± 100 micron range of accuracy.

Below you can see the results of an inaccurate print. The blue is indicating that the 3D print shrunk more than “required”, which means it shrunk by more than 100 microns. The red indicates that the 3D print did not shrink “enough” or might just show an inaccuracy in the design or result from poor printing quality.

Factors influencing Accuracy
"According to the manufacturer, my 3D printer should be producing ultra accurate 3D prints. In reality, they're only moderately accurate. Why's that?" - This is a common issue found throughout all 3D printing forums. Inaccuracies can be caused by the 3D printer, but one should also always consider following factors:
-
Environmental factors - e.g. light exposure and temperature
- Resin quality and handling
- Post-Processing Procedure
- Slicing Process
Let's get a closer look on how you can control those factors and the effect they have on the accuracy of your prints.
1. Environment
Light controlled and well ventilated printing room
All manufacturers of 3D printers recommend a specific environment for a 3D printing set up. It should be located in an area where light is controllable (to avoid accidental UV light exposure) with good ventilation (this last part is more relevant for health reasons than accuracy). The logic behind this is simple. Resin that comes in touch with UV light starts curing and hardens, this could ruin a perfectly good resin permanently.
Establish a permanent room temperature between 18° and 25° C
Temperature is also a central factor. The mechanical properties of resin are calculated usually for a “regular” room temperature range. If you live in a part of this world that gets incredibly hot or cold, you need to ensure your resin bottles are at a temperature between 18 and 25 Celsius. For conservation, keeping your resin at a lower temperature is actually beneficial, but the user has to ensure a room temperature resin (18 - 25 degree Celsius) before starting a print.
Depending on the resin, an environment that's too either too hot or too cold, can prevent your resin from hardening during the curing process, which results in misprints.
2. Resin Quality
Purchase Premium Resins
We’ve actually done our own study on this and published it in a previous blog post. The result shows clearly that a premium resin will produce an accurate result that doesn’t lose its mechanical properties for an extended period of time, while the cheaper resin showed very unsatisfactory accuracy results.
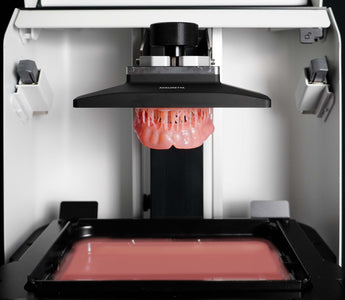
3. Post-Processing Procedure
Ensure a Validated Printing Workflow
A reliable curing procedure is an essential step of ensuring the accuracy of your 3D print (and the safety of your patients). This process requires pre-set parameters and careful execution. A 3D print that’s not cured properly, will continue its curing process in an uncontrolled manner when exposed to natural UV light. This will cause inaccurate results over time.
Ackuretta provides a validated printing workflow, which means that we can guarantee the biocompatibility and quality of a 3D print if it is produced using the entire Ackuretta 3D printing solution. This means that you start with the slicing software, Alpha 3D, the 3D printer, DENTIQ or SOL, the CURO resin range and finally the post-processing equipment, CLEANI and UV Box.

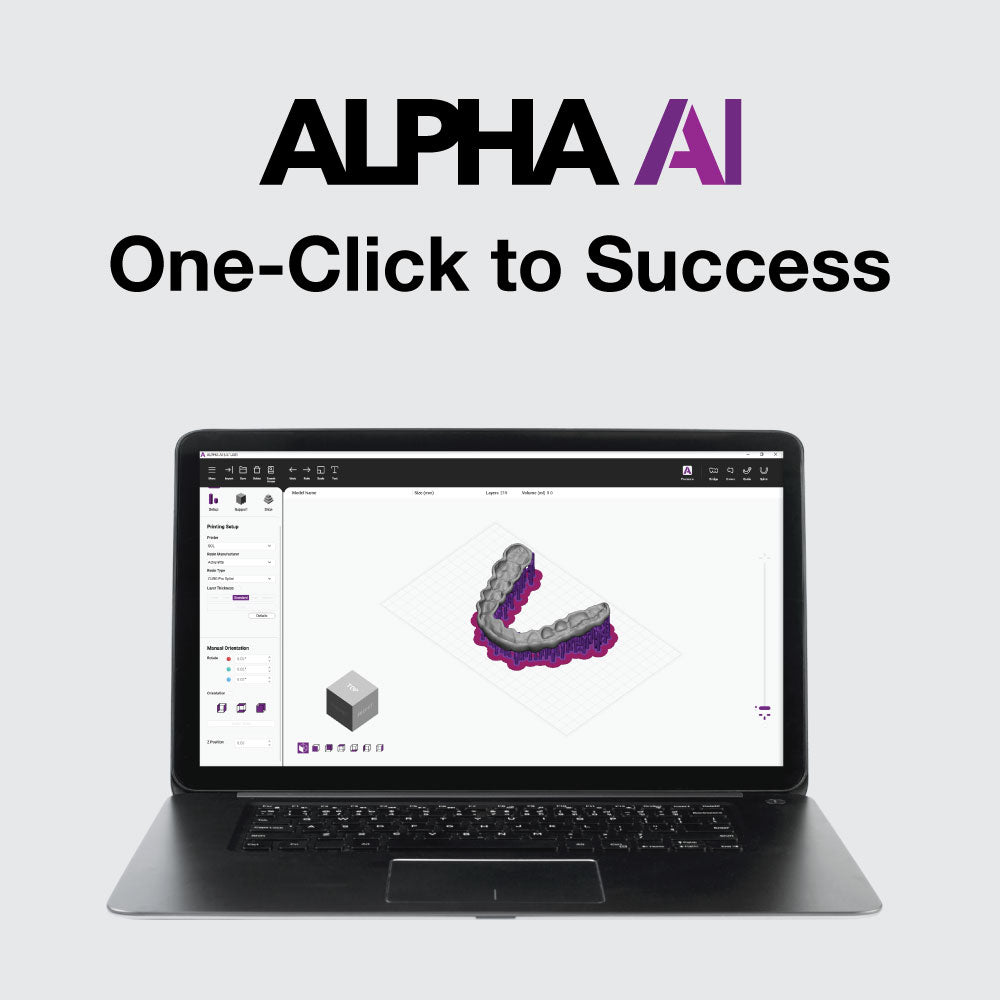
4. Slicing Software
Careful Print Design
Slicing your design in a software is the final step before starting your printing process. We see a lot of misprints, due to poorly planned setups. There are three central forces at play, suction, peeling/separation force and gravity, which have an impact on how you should plan your print.
Good design can limit or even remove these forces, safeguarding the accuracy of your print.
For example, if you print a surgical guide vertically, the peeling/separation force might cause your drilling holes to be oval, whereas printing it parallel to the build platform will result in an accurate result.
Common Mistake: Be aware that if you intend to print a hollow model, you should never place the model flat on the build platform. Such a placement will cause air to get stuck inside your model and result in a failed print.
Suggestion: Depending on the application you intend to print, we advise you to tilt it to an angle and to add the supports on that part of the application that does not require 100% accuracy. Below, we show you how to ideally position a hollow model on the build platform in Alpha 3D, a slicing software designed by Ackuretta.

Last, but not least ... 3D Printer Quality
Some 3D printers are just able to print more accurately than others. Premium components are more likely to cost more, but at the same time will produce more accurate results over a longer period of time.
Different types of 3D printers are able to achieve different levels of accuracy, as we've outlined in a previous article (DLP vs. SLA vs. LCD 3D Printers). SLA and LCD printers tend to be able to produce more accurate results than a DLP printer, however, if the components of the printer are cheap and accuracy might be compromised right from the start and/or the printer’s accuracy performance will decrease faster than with premium products.


Let's summarize what we've just learnt:
3D Printing Accuracy is not only determined by the Printer.
3D printing accuracy has many faces - when just looking at the 3D printers, you will find that manufacturers that value high-quality of the components, will deliver years of reliable 3D prints.
So when asking what is the most accurate 3D printer, you must ask for which manufacturer provides an all round 3D printing solution, including 3D printers, resin and post-processing equipment that can guarantee accuracy from start to finish.
Premium Resin = Reliable Results
Same goes for resin - there’s a rule of thumb for dental 3D printing - if it ends up in the mouth of your patient, go for class 2, biocompatible resin - prices might be higher, but safety must be your first priority. Plus the resin impacts the smoothness and the comfort of the dental application. An inaccurate one will be unlikely to result in a positive patient experience.
Carefully plan and execute your Post-Processing
Pay attention to the details - UV light wavelength and curing time, do those things right and you’ll have a great result. An uncontrolled curing process will result in an inaccurate print over time.
Slicing Software matters
Use a slicing software that fits into your workflow seamlessly and actually makes your life easier, not harder. Alpha 3D is designed just for dental applications - zero guesswork, simple slicing process. Just follow our pro tips to get ideas for how to orientate your prints for perfect 3D prints.