Ackuretta Tech Articles
All about UV Curing Ovens
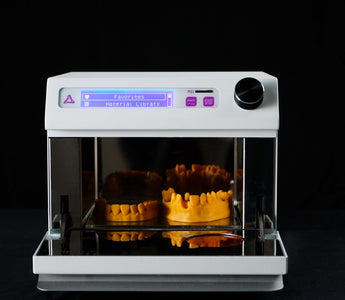
How do you choose the correct UV curing unit for your dental applications? It’s the same answer as with almost anything in dental 3D printing - it depends on the volume and the type of application you are aiming to produce.
You will find that there are two types of curing units that are often recommended. They’re labeled with a class I or class II. This classification plus the size of the unit will have a significant impact on the price.
To make this decision a little easier for you, we’ve assembled a list of features that a high-quality curing unit should possess and which applications require either class I or class II devices.
Class I & Class II Explained
Class I UV Curing Ovens
...can be used for anything that will not be used intraorally for over 30 days. This includes applications like surgical guides, ibt or dental models. Thus, an orthodontist mainly focused on in-house aligner production, might be well-served with this type of UV curing unit.
Class II UV Curing Ovens
...can be used for a wider range of applications, as any resin cured with this box (as long as the UV wavelengths are compatible with the resin) can be used intraorally for several months - there is no expiration date on dental applications produced with class II resins and cured with a class II UV unit. These applications include splints, long-term temporaries (crowns and bridges), dentures and also implant-supported prosthesis.
You should consider that resin manufacturers go through lengthy validation processes of their resins. They test the biocompatibility of the application to ensure patient safety and create “instructions for use” with clear guidelines as to which post-processing equipment & procedure is suitable for their resin (click here to learn more about post-processing). Thus, we recommend purchasing a pre-validated UV box that is compatible with the resin you plan to use.
Features of UV Curing Units
You might be wondering what these various specs mean that marketing & sales agents are throwing at you. We'll have a closer look at the ones you should pay attention to and also explain why these matter to your end results.
Mix Matrix LED Spectrum
The use of a mix matrix LED spectrum from 365/385/405 nm gives a in-depth cure by penetrating deeper into the material and reacting with the photoinitiator more thoroughly. This setup is usually found in a more premium UV box.
Most inexpensive UV boxes use a single wavelength LED which is usually 405 nm. It is suitable for a basic level of curing but certainly not a complete cure.
Let's take a look at the reason behind that:
Resins contain photoinitiators, these are necessary for the resin to become solid - the process of polymerization. The light in your curing unit will emit a certain UV light wavelength, usually between 385 and 405 nm, and cure the resin that’s inside the vat. So if you buy a resin that is photosensitive only to a 405 nm wavelength, then a UV lamp that emits 385 nm will be of little use - the resin in the vat will not be cured. However, resins can be equipped with “multiple” wavelength photoinitiators - 385 to 405 nm, and 3D printers can equally shine UV light at varying wavelengths allowing for more versatility while maintaining high-quality results.
This is true for our CURO resin range - our biocompatible class I and class II resins have a curing window between 385 to 405nm.
Use of Nitrogen
This is one of the most frequently asked question.
Nitrogen is often used in more premium UV boxes to create an inert environment in the chamber during the curing process. The use of nitrogen gas creates an inhibition layer around the part whereby bacteria and other impurities are unable to stick to and get cured with the part. This ensures the biocompatibility of the printed piece. However, keeping nitrogen containers in your dental office might be a bit troublesome due to the hazardous nature of the material.
That’s why there’s now a trend away from this types of curing units.
LED Optical Layout
This feature is critical for a thorough and even cure.
Inexpensive curing units without a 360 degree curing ability require you to flip your parts to cure each part of the application. But curing on one side creates inward shrinkage in a particular direction, when flipping the part shrinkage in the opposite direction will occur, potentially causing inaccuracies. While it is still possible to achieve high accuracy, the performance of 360 curing units will produce more consistent results and is thus better suited for dental applications that require high accuracy.
Additionally, 360 curing units do not require your physical presence for the full curing job, reducing your personal workload. A curing unit not equipped with that, will require you to be physically present to flip the part and thereby prolonging your workflow.
Preset Curing Times
While you should be aware of the instructions for use for the resins you use, some curing units come equipped with preloaded curing times for the most popular 3D printing resins. Thus, alleviating you of the burden of constantly checking the fine print of resin bottles.







 Loading ...
